Tuesday, December 27, 2011

My favorite Christmas stuff !

So, I hope everyone has had a wonderful Christmas season. I know I have !! I've been so busy with crafting, shopping, working, and celebrating I completely forgot about my blog for a bit ! So, here comes an overload of what I've worked on and gotten recently :)


We'll start with my new tree topper ! I won't try to give any step by step directions because I kinda free handed it and I wouldn't wish for anyone to go through all of that haha ! I will tell ya that its made out of black felt, the sparkliest red ribbon I could find, and lots of hot glue ! (I can't sew a thing !) I love it ! I've probably been looking for the perfect tree topper for 4 years, and just like that, problem solved !


Second, we have my beautiful (finally finished) window. I had originally planned on keeping the original glass in there after the frame was finished, but during the move, the glass was broken :( But, what did mommy always teach you ?? When one door closes, God opens a window... or something along those lines and a window was opened !! I had seen something kinda similar in an old frame where someone had put wire through it and just hung pictures from clothes pins so that's what I did ! I found the cutest itty bitty clothes pins from Joanns and painted them red to match the rest of the living room. Currently I have "Merry Christmas" (courtesy of my mother in law's cricut) and then some Christmas cards. It may be my favorite thing in the house.


This is my new Scentsy warmer ! Eric's Aunt got it for me for Christmas and I was thrilled !! I've felt for awhile that all the cool kids had scentsy and I was just out of the loop :( I just figured that it was a little luxury I didn't really need... candles are just fine ! Nope !! I don't know what I did before scentsy came along. I currently have "Eskimo Kiss" in there and my apartment smells lovely !


Here is my last picture I promise. This is my new media storage cabinet. I have been dying for one for months ! I finally found the perfect one on overstock.com and asked for it for Christmas. I'm pretty sure it took Eric and I two hours and several four lettered words to put it together. What is it with these directions that use one sentence to describe 8 steps !! Anyways, I'm really excited about this big guy. I want to treat it like the mantle I've never had. The house is still a bit of a mess just because we're still trying to find a home for all our new stuff. Stay tuned for more fun stuff !


Monday, November 14, 2011

Tie Dye Cupcakes !

My dear friend, Angela, is quite the baker. She invited me over for a fun night of making some awesome cupcakes !


(Thats us)

We started out with just regular cake mix batter. After following the directions on the box, we then separated the batter into 6 different bowls so we could start the coloring process !


Boom ! 6 awesome colors !! Then we started to spoon in a little of each color into the cupcake liners until they were each about 3/4 of the way full. They ended up looking soooo cool ! This is before we put them in the oven


Here they are looking scrumptious !!


Now all cooled and ready to go ! I will warn you now, I am the worst cupcake decorater ever !! We also dyed the frosting (from a can) to pretty colors too :)


Here's the inside of one of the cupcakes (I put so much icing on it, it wouldn't stand up ha!)


This was so much fun ! I'm so glad to have fun friends to do stuff like this with :)
~'Til the next time


Thursday, November 10, 2011

Burlap Wreath

So, this is the cutest wreath I've ever seen in real life, so I'm pretty proud its mine haha. I saw this on pinterest initially and it looked like this

Pinned Image

I love it ! However, its sold on Etsy for about $40.00 so I figured I could make it myself for much cheaper. Off I went to Joann's ! (Which is probably my favorite store as of late) I found a wreath, some pins and burlap for $3.99 per yard. I kinda fiddled around online for a little bit looking for a way to make it look good and eventually found a how-to saying to use 4x4 little squares. I'll try to show what they need to look like cause I'm not really good at explaining things.

So, you fold 2 opposite corners together so it looks like a triangle.


Then, fold in a 3rd corner. Make sure that you keep all the corners kinda flat so it'll be easier to pin it into the foam.


Finally, fold down the last corner. I think it kinda ends up looking like a fortune cookie maybe ? No ? Ok ! Now using the pins, I just pinned one "bubble" at a time each one covering the previous pin. I may have gotten yellow pins so they reeeally stood out haha. So now, Tada !


Super cute wreath ! I origionally put a red bow on there, but it was too small, so I'll show ya whenever I decide what to add to it. As of right now, it looks too cute not to be anywhere else but on my front door :) I ended up spending about $17 bucks ! Pretty great compared to the origional price tag ! I hope this makes you feel inspired !


We've finally finished the Chalkboard !!

Sorry I've been gone soooo long ! I'm really bad at keeping up with this for some reason :-/ Anyway, if you don't remember what we've done with the poor old windows from the lady's basement, I'll refresh your memory ! I had painted one window a really pretty light green. Eric then got his nifty sander and scuffed it up a little bit.


Now it came time to figure out what to put in the panes for the chalkboard part. It was origionally going to be the glass it came with, but along came a storm and knocked over the glass. (I had it outside cause it was really gross and dirty) Anyways, after a lot of thinking, We went to Home Depot and got a board about 1/4 inch thick and 2ft by 4ft width and height. We ended up having to cut it twice because I may or may not be good at measuring hee hee. After finally getting it in the perfect size, it was time for chalkboard paint !


I think we did 2 or 3 coats of the chalkboard spraypaint. If i was to do this all over again, I would have primed the wood before because it really soaked up the paint and even now that its done, I can still see the wood grooves and it kinda bugs me haha. Oh well ! Here's the finished product !


I found the cute little pail out at the World's Longest Yard Sale. I think I ended up paying like a quarter for it which is awesome :) So, this is the most in depth thing that we've made so far and I'm so proud of it ! I hope you found this very interesting and inspiring !

Thursday, July 28, 2011

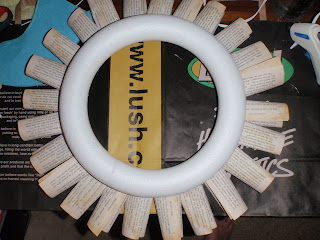
Book pages wreath

Everyone knows I like to read, but I also just like books and they way they look ! I recently saw something online I knew had to try. Its a wreath made out of book pages ! Here's what you need...
A styrophoam wreath
book (or two)
hot glue gun
ribbon to hang it up

I started with the back rolling the pages every which way until i had one row all the way around the wreath. Make sure you don't fold them, you want it to look round and full. So, once I was done with the back row, I truned it over so I could start working on the front, like this

Then once you start doing the middle and front, it gets a little more difficult. For the tops and sides, I folded a little tab on the bottom so it would have a way to stand up still. This was a time consuming process and I'm not the world's most patient person. I'm not gonna lie, I'm still not done. I need to fill it in a little bit more, I was just super excited about it and wanted to share !

Here's what it looks like now on our guest room's door. As you can tell, the middle needs a little bit more "fluff". I'm not really good at explaining, so lucky for me, http://www.livingwithlindsay.com/ has put up a little YouTube video to show to to fold and put the pages in to fill it in.


So, thats my wreath ! Hopefully, I'll be able to do something else fun and crafty soon ! I've got something in mind for a new lamp shade :)

Wednesday, July 6, 2011

i have acquired something...

Isn't she beautiful !? I didn't remember to take a picture of a before picture. This is after we scraped off a bunch of old paint and dirt. Luckily I have an incredibly sweet husband, and he was willing to help out. He took me to lowes and got a paint scraper along with some sanding blocks. I think we spent less than 10 bucks :)

When we first got this window, it had all 4 window panes in it. I sat it outside since it was so dirty, but a storm came by, knocked it down, and broke the glass !  Stupid storm :-/ Its ok though, I have another idea to do with this baby. We decided to put it up in the dining room, so the time came to pick out a color for the frame. Our dining room plates are a green and brown almost paisley pattern, so we chose a lighter green to brighten up the room a little. I have quite the love for dark colored furniture, so bright accessories are always necessary.
                                   

Here it is ! I forgot to look at the name of the color before I threw away the paper, so I'm gonna call it light green. Stay tuned to see what I do to finish it off !

Sunday, April 24, 2011

Rhythm and Brews

           I am writing this with ringing ears and a scratchy throat. Some friends and I went last night to check out an 80's cover band, and before I continue, I must say that I should have been alive during that decade. I was born to head bang to Joan Jett, Metallica, Kiss, Def Leppard, and Journey. The band, Velcro Pygmies, was outstanding ! I don't know if I'm writing the review based on the band or the place, but I was blown away.
          It's a simple place, in the middle of downtown. A place I've honestly passed by hundreds of times and never really thought much about it. You walk in and immediately in front is the stage. There's a balcony below for the ones that may not be so interested in standing (or jumping) all night. It was 12 bucks to get in, and completely worth it. The drinks were moderately priced, so it was a pretty cheap night for three and a half hours of entertainment. The Pygmies set started at 10:30 and they played well into the wee hours of the morning.
         There was a Michael Jackson cover band here a few weeks ago and people are already talking about the band coming in beginning in May. Not too shabby for a little bar I've always passed by. If you like good, live music, and possibly losing some hearing, this is the place to go.

Saturday, April 23, 2011

Urban Stack

         Urban Stack. All I can say is... wow ! Their burger absolutely blew me away. I, like the next person, like a burger every once in awhile, but this after discovering this restaurant that might switch to love ! I went on a Friday at lunch time, and it was packed ! From the get-go, I fell in love with the ambiance of the place. Its an old brick building remade to be cool and chic with not-your-average booths and single bulb lights. Its a family place, but with a hip vibe that makes it cool enough for a 20-something year old.
        I had "The Steakhouse" which is built with U.S. barbeque sauce, bacon, their atomic horsey sauce, onion ring, and cheddar cheese. I was sold on the first bite: perfectly juicy, filling, and crunchy. Their burgers are 100% vegetarian fed, hormone and antibiotic free. They deal with local farmers and businesses for their fruits, veggies, beer, and even ice cream. That's right, ice cream. For dessert I had a smores shake made from Clumpie's Ice Cream. Absolutely delicious !
        Overall, I give Urban Stack 2 thumbs way up. They have made life-long customers out of my burger-loving husband and me.